 MCP Server Documentation
MCP Server Dokumentation
Documentación del Servidor MCP
Guide d'utilisation du serveur MCP Octoparse
Guida Utente Octoparse MCP Server
Octoparse MCPサーバードキュメント
MCP 서버 문서
Use AI assistants to manage and automate Octoparse web scraping tasks
KI-Assistenten zur Verwaltung und Automatisierung von Octoparse-Web-Scraping-Aufgaben einsetzen
Utiliza asistentes de IA para gestionar y automatizar las tareas de web scraping de Octoparse
Utilisez des assistants IA pour gérer et automatiser vos tâches de web scraping avec Octoparse.
Lascia che gli assistenti AI ti aiutino a gestire le attività di web scraping con Octoparse
AIアシスタントを活用して、Octoparseのウェブスクレイピングタスクの管理と自動化を実現しましょう。
Octoparse 웹 스크래핑 작업을 AI 어시스턴트를 통해 제어하고 자동화할 수 있는 MCP(모델 컨텍스트 프로토콜) 서버입니다.
Before You Begin
Bevor Sie Beginnen
Antes de empezar
Prérequis
Prima di iniziare
はじめましょう
사전 준비
Before connecting to the Octoparse MCP server, make sure you have the following:
Bevor Sie eine Verbindung zum Octoparse MCP-Server herstellen, stellen Sie sicher, dass Sie Folgendes haben:
Antes de conectarte al servidor MCP de Octoparse, asegúrate de tener lo siguiente:
Avant de vous connecter au serveur MCP d'Octoparse, assurez-vous de disposer des éléments suivants :
Prima di connettersi al server Octoparse MCP, assicurarsi di disporre dei seguenti requisiti:
Octoparse MCPサーバーに接続する前に、以下の準備ができているか確認してください。
Octoparse MCP 서버에 연결하기 전에 다음 사항을 확인하세요.
- An Octoparse Account: Register at Octoparse Official Website if you don't already have one.
- An MCP-compatible client: For example: ChatGPT, Claude Desktop, Claude, Gemini CLI, Cursor, VS Code, or any other client that supports MCP.
- MCP server configuration access: You’ll need permission to edit your MCP client settings to add the Octoparse MCP server address.
- Ein Octoparse-Konto: Registrieren Sie sich auf der offiziellen Octoparse-Website, falls Sie noch keines haben.
- Ein MCP-kompatibler Client: Zum Beispiel: ChatGPT, Claude Desktop, Claude, Gemini CLI, Cursor, VS Code oder ein anderer Client, der MCP unterstützt.
- Zugang zur MCP-Server-Konfiguration: Sie benötigen die Berechtigung, die Einstellungen Ihres MCP-Clients zu bearbeiten, um die Octoparse MCP-Serveradresse hinzuzufügen.
- Una cuenta de Octoparse: Regístrate en el sitio web oficial de Octoparse si aún no tienes una.
- Un cliente compatible con MCP: Por ejemplo, ChatGPT, Claude Desktop, Claude, Gemini CLI, Cursor, VS Code u otro cliente que admita MCP.
- Acceso a la configuración del servidor MCP: Necesitarás permiso para editar la configuración de tu cliente MCP y añadir la dirección del servidor MCP de Octoparse.
- Compte Octoparse : inscrivez-vous sur le site officiel d'Octoparse si vous n'en possédez pas déjà un.
- Client compatible MCP : par exemple ChatGPT, Claude Desktop, Claude, Gemini CLI, Cursor, VS Code ou tout autre client prenant en charge MCP.
- Accès à la configuration du serveur MCP : vous devez avoir la permission de modifier les paramètres de votre client MCP afin d’ajouter l’adresse du serveur MCP d’Octoparse.
- Un account di Octoparse: Se non ne hai uno, registrati sul sito ufficiale di Octoparse.
- Un client compatibile con MCP: ChatGPT, Claude Desktop, Claude, Gemini CLI, Cursor, VS Code, o altre applicazioni compatibili con MCP.
- Accesso alla configurazione del server MCP: Per aggiungere l'indirizzo del server Octoparse al client MCP, sarà necessario disporre dell'autorizzazione per modificare le impostazioni del client MCP.
- Octoparseアカウント: まだお持ちでない場合は、 Octoparse公式サイトで登録してください。
- MCP対応クライアント: ChatGPT、Claude Desktop、Claude、Gemini CLI、Cursor、VS Codeなど、MCPをサポートしているクライアントが必要です。
- 設定ファイルへのアクセス権限: MCPクライアントの設定を編集し、Octoparse MCPサーバーのアドレスを追加できる権限が必要です。
- Octoparse 계정 - Octoparse MCP 서버 사용을 위해 필수입니다. 계정이 없는 경우 Octoparse 공식 웹사이트에서 생성해야 합니다.
- MCP 호환 클라이언트 - ChatGPT, Claude Desktop, Claude, Gemini CLI, Cursor, VS Code 또는 MCP를 지원하는 기타 클라이언트
- MCP 서버 설정 권한 - Octoparse MCP 서버 주소를 등록하기 위해 클라이언트 설정 파일에 대한 편집 권한이 필요합니다.
Quick Start
Schnellstart
Inicio rápido
Démarrage rapide
Avvio Rapido
クイックスタート
빠른 시작
You can connect to the Octoparse MCP server using any of the methods below. After configuration, OAuth authentication is required.
Sie können sich mit dem Octoparse MCP-Server über eine der folgenden Methoden verbinden. Nach der Konfiguration ist eine OAuth-Authentifizierung erforderlich.
Puedes conectarte al servidor MCP de Octoparse mediante cualquiera de los métodos que se indican a continuación. Tras la configuración, se requiere autenticación OAuth.
Vous pouvez vous connecter au serveur MCP Octoparse en utilisant l’une des méthodes ci-dessous. Après la configuration, une authentification OAuth est nécessaire.
Puoi connetterti al server Octoparse MCP utilizzando i seguenti metodi. L'autenticazione OAuth è richiesta dopo la configurazione.
以下のいずれかの方法で接続できます。設定後、OAuth認証が必要となります。
Octoparse MCP 서버는 다양한 MCP 클라이언트를 통해 연결할 수 있습니다. 서버 설정 완료 후 OAuth 인증 절차가 요구됩니다.
MCP Client Setup MCP-Client-Einrichtung Configuración del cliente MCP Configuration du client MCP Configurazione del Client MCPクライアントのセットアップ MCP 클라이언트 설정
Follow the steps below to add the Octoparse MCP server to your MCP client.
Folgen Sie den untenstehenden Schritten, um den Octoparse MCP-Server zu Ihrem MCP-Client hinzuzufügen.
Sigue los pasos que se indican a continuación para añadir el servidor MCP de Octoparse a tu cliente MCP.
Suivez les étapes ci-dessous pour ajouter le serveur MCP Octoparse à votre client MCP :
Ecco come aggiungere il server Octoparse MCP al tuo cliente MCP.
以下の手順に従って、ご利用のMCPクライアントにOctoparse MCPサーバーを追加して下さい。
다음 절차에 따라 사용 중인 MCP 클라이언트에 Octoparse MCP 서버를 등록합니다.
Step-by-step configuration
Follow these steps to connect Octoparse with ChatGPT.
Step 1: Open ChatGPT account/profile section- Log in to ChatGPT using a Plus, Team, or Enterprise account
- Click your profile avatar in the bottom-left corner
- Select Personalization
 Step 2: Navigate to Apps
- In the left sidebar, click Apps
- Under Enabled apps, select Advanced settings
 Step 3: Enable Developer mode
- In Apps, click Advanced settings
- Toggle Developer mode (Beta) ON
- Review the warning message and proceed
Developer mode allows you to add unverified MCP servers. Use at your own risk.
 Step 4: Create the Octoparse app (MCP server)
- Click Create app
- Fill in the following fields:
- Name:
Octoparse - MCP Server URL:
https://mcp.octoparse.com
- Name:
- Set Authentication to OAuth
- Leave OAuth Client ID and Client Secret empty
- Check "I understand and want to continue"
- Click Create
 Step 5: Authorize access (OAuth)
- ChatGPT will redirect you to Octoparse for authorization
- Review the requested permissions
- Click Yes, Allow
Once approved, ChatGPT can securely access your Octoparse account via OAuth.
Schritt-für-Schritt-Konfiguration
Befolgen Sie diese Schritte, um Octoparse mit ChatGPT zu verbinden.
Schritt 1: Öffnen Sie die ChatGPT-Einstellungen- Melden Sie sich bei ChatGPT mit einem Plus-, Team- oder Enterprise-Konto an
- Klicken Sie auf Ihr Profilbild in der unteren linken Ecke
- Wählen Sie Personalisierung aus
Schritt 2: Navigieren Sie zu Apps
- Klicken Sie in der linken Seitenleiste auf Apps
- Wählen Sie unter Aktivierte Apps die Option Erweiterte Einstellungen aus
Schritt 3: Entwicklermodus aktivieren
- Klicken Sie in Apps auf Erweiterte Einstellungen
- Schalten Sie den Entwicklermodus (Beta) auf EIN
- Lesen Sie die Warnmeldung und fahren Sie fort
Der Entwicklermodus ermöglicht das Hinzufügen ungeprüfter MCP-Server. Nutzung auf eigenes Risiko.
Schritt 4: Die Octoparse-App (MCP-Server) erstellen
- Klicken Sie auf App erstellen
- Füllen Sie die folgenden Felder aus:
- Name:
Octoparse - MCP Server URL:
https://mcp.octoparse.com
- Name:
- Setzen Sie Authentifizierung auf OAuth
- Lassen Sie OAuth Client ID und Client Secret leer
- Aktivieren Sie das Kästchen "Ich verstehe und möchte fortfahren"
- Klicken Sie auf Erstellen
Schritt 5: Zugriff autorisieren (OAuth)
- ChatGPT leitet Sie zur Autorisierung an Octoparse weiter
- Überprüfen Sie die angeforderten Berechtigungen
- Klicken Sie auf Ja, erlauben
Nach der Genehmigung kann ChatGPT sicher über OAuth auf Ihr Octoparse-Konto zugreifen.
Configuración paso a paso
Sigue estos pasos para conectar Octoparse con ChatGPT.
Paso 1: Abrir la configuración de ChatGPT- Inicia sesión en ChatGPT utilizando una cuenta Plus, Team, o Enterprise
- Haz clic en tu foto de perfil en la esquina inferior izquierda
- Selecciona Personalización
Paso 2: Ir a Apps
- En el menú lateral izquierdo, haz clic en Apps
- En la sección Apps habilitadas, selecciona Configuración avanzada
Paso 3: Activar el modo desarrollador
- En Apps, haz clic en Configuración avanzada
- Activa el modo desarrollador (Beta)
- Acepta el mensaje de advertencia y continúa
El modo desarrollador te permite añadir y utilizar servidores MCP no verificados. Úsalo bajo tu propia responsabilidad.
Paso 4: Crear la app de Octoparse (servidor MCP)
- Haz clic en Crear app
- Completa los siguientes campos:
- Nombre:
Octoparse - URL del servidor MCP:
https://mcp.octoparse.es
- Nombre:
- Configura la autenticación como OAuth
- Deja vacíos los campos OAuth Client ID y Client Secret empty
- Marca la opción "Entiendo y quiero continuar"
- Haz clic en Crear
Paso 5: Autorizar el acceso (OAuth)
- ChatGPT te redirigirá a Octoparse para la autorización
- Revisa los permisos solicitados
- Haz clic en Sí, permitir
Una vez aprobado, ChatGPT podrá acceder de forma segura a tu cuenta de Octoparse mediante OAuth.
Configuration étape par étape
Suivez les étapes ci-dessous pour connecter Octoparse à ChatGPT.
Étape 1 : Ouvrir les paramètres de ChatGPT- Connectez-vous à ChatGPT avec un compte Plus, Team ou Enterprise
- Cliquez sur votre avatar de profil en bas à gauche de l’interface
- Sélectionnez Personnalisation
Étape 2 : Accéder aux applications
- Dans la barre latérale gauche, cliquez sur Applications
- Sous Applications activées, sélectionnez Paramètres avancés
Étape 3 : Activer le mode Développeur
- Dans Applications, cliquez sur Paramètres avancés
- Activez Mode développeur (Bêta)
- Prenez connaissance du message d’avertissement et continuez
Le mode développeur vous permet d’ajouter des serveurs MCP non vérifiés. Utilisez cette fonctionnalité à vos propres risques.
Étape 4 : Créer l’application Octoparse (serveur MCP)
- Cliquez sur Créer une application
- Renseignez les champs suivants :
- Nom :
Octoparse - URL du serveur MCP :
https://mcp.octoparse.com
- Nom :
- Définissez Authentication sur OAuth
- Laissez les champs OAuth Client ID et Client Secret vides
- Cochez "I understand and want to continue"
- Cliquez sur Créer
Étape 5 : Autoriser l’accès (OAuth)
- ChatGPT vous redirigera vers Octoparse afin de procéder à l’autorisation
- Vérifiez les autorisations demandées
- Cliquez sur Oui, autoriser
Une fois l’autorisation accordée, ChatGPT pourra accéder de manière sécurisée à votre compte Octoparse via OAuth.
Configurazione con passaggi
Segui questi passaggi per connettere Octoparse a ChatGPT.
Passaggio 1: vai alle impostazioni di ChatGPT- Accedi a ChatGPT con un account Plus, Team o Enterprise
- Clicca sull'avatar del tuo profilo nell'angolo in basso a sinistra
- Seleziona Personalizzazione
Passaggio 2: vai ad App
- Nella barra laterale sinistra, clicca su App
- In App abilitate, seleziona Impostazioni avanzate
Passaggio 3: abilita la modalità sviluppatore
- In App, fai clic su Impostazioni avanzate
- Attiva la modalità Modalità Developer (Beta)
- Leggi il messaggio di avviso e procedi
La modalità Developer consente di aggiungere server MCP non verificati. L'utilizzo è a proprio rischio.
Fase 4: crea l'applicazione Octoparse (server MCP)
- Clicca su Crea app
- Compila i seguenti campi:
- Nome:
Octoparse - URL del server MCP:
https://mcp.octoparse.com
- Nome:
- Imposta Autenticazione su OAuth
- Lascia vuoti i campi ID client OAuth e Chiave segreta client
- Seleziona la casella "I understand and want to continue"
- Clicca su Crea
Passaggio 5: autorizza l'accesso (OAuth)
- ChatGPT ti reindirizzerà a Octoparse per l'autorizzazione
- Verifica le autorizzazioni richieste
- Fai clic su Yes, Allow
Una volta approvata, ChatGPT potrà accedere in modo sicuro al tuo account Octoparse tramite OAuth.
設定ステップ
以下の手順に従って、OctoparseとChatGPTを連携させてください。
ステップ 1:ChatGPTの設定を開く- Plus、Team、またはEnterpriseアカウントでChatGPTにログインします
- 画面左下のプロフィールアイコンをクリックします
- 「パーソナライズ」を選択します
ステップ 2:アプリ設定へ移動する
- 左側のサイドバーで「アプリ」をクリックします
- 「有効化されたアプリ」の下にある「高度な設定」を選択します
ステップ 3:開発者モードを有効にする
- 「アプリ」内の「高度な設定」をクリックします
- 「開発者モード (ベータ版)」をオンに切り替えます
- 警告メッセージを確認し、続行します
開発者モードでは、未検証のMCPサーバーを追加できます。自己責任においてご利用ください。
ステップ 4:Octoparseアプリ(MCPサーバー)を作成する
- 「アプリを作成する」をクリックします
- 以下の項目を入力してください:
- 名前:
Octoparse - MCPサーバーの URL:
https://mcp.octoparse.com
- 名前:
- 「認証」を OAuth に設定します
- OAuth クライアント ID と クライアント シークレット は空欄のままにします
- 「理解したうえで、続行します」にチェックを入れます
- 「作成する」をクリックします
ステップ 5:アクセス権限を承認する (OAuth)
- ChatGPTからOctoparseの承認画面にリダイレクトされます
- 要求されている権限を確認します
- 「承認する」をクリックします
承認が完了すると、ChatGPTはOAuth経由でOctoparseアカウントに安全にアクセスできるようになります。
단계별 설정 방법
아래 단계를 순서대로 따라 해주세요.
Step 1: ChatGPT 설정 열기- Plus, Team 또한 Enterprise 계정으로 ChatGPT에 로그인합니다.
- 좌측 하단의 프로필 아바타를 클릭합니다.
- 개인 설정을 선택합니다.
Step 2: Apps 메뉴로 이동
- 좌측 사이드바에서 Apps를 클릭합니다.
- Enabled apps 아래의 Advanced settings를 선택합니다.
Step 3: Developer Mode 활성화
- Apps 화면에서 Advanced settings를 클릭합니다.
- Developer mode (Beta)를 ON으로 전환합니다.
- 경고 메시지를 확인한 뒤 계속 진행합니다.
Developer mode를 활성화하면 검증되지 않은 MCP 서버를 추가할 수 있습니다. 사용 시 주의가 필요합니다.
Step 4: Octoparse 앱(MCP 서버) 생성
- Create app을 클릭합니다.
- 아래 정보를 입력합니다.
- Name:
Octoparse - MCP Server URL:
https://mcp.octoparse.com
- Name:
- Authentication을 OAuth로 설정합니다.
- OAuth Client ID와 Client Secret은 입력하지 않고 비워둡니다.
- "I understand and want to continue"항목에 체크합니다.
- Create 버튼을 클릭합니다.
Step 5: 접근 권한 승인 (OAuth 인증)
- ChatGPT가 Octoparse 인증 페이지로 자동 이동합니다.
- 요청 권한을 확인합니다.
- Yes, Allow를 클릭합니다.
승인이 완료되면 ChatGPT가 OAuth 방식으로 안전하게 Octoparse 계정에 접근할 수 있습니다.
Run the command below to add the Octoparse MCP server:
Führen Sie den folgenden Befehl aus, um den Octoparse MCP-Server hinzuzufügen:
Run the command below to add the Octoparse MCP server:
Exécutez la commande suivante pour ajouter le serveur MCP Octoparse :
Esegui il seguente comando sotto per aggiungere il server Octoparse MCP:
ターミナルで以下のコマンドを実行して、Octoparse MCPサーバーを追加します。
다음 명령어를 실행하여 Octoparse MCP 서버를 추가합니다.
claude mcp add octoparse -s user -t http https://mcp.octoparse.comAfter adding the server, open the MCP menu, select octoparse, and complete OAuth authorization in your browser.
Once authorized, Claude can access Octoparse MCP tools.
Nachdem der Server hinzugefügt wurde, öffnen Sie das MCP-Menü, wählen Sie octoparse aus und schließen Sie die OAuth-Authentifizierung in Ihrem Browser ab.
Nach der Authentifizierung kann Claude auf die Octoparse MCP-Tools zugreifen.
After adding the server, open the MCP menu, select octoparse, and complete OAuth authorization in your browser.
Once authorized, Claude can access Octoparse MCP tools.
Après avoir ajouté le serveur, ouvrez le menu MCP, sélectionnez octoparse et effectuez l’autorisation OAuth dans votre navigateur.
Une fois l’autorisation terminée, Claude pourra accéder aux outils MCP d’Octoparse.
Dopo aver aggiunto il server, apri il menu MCP, seleziona Octoparse e completa l'autorizzazione OAuth nel tuo browser.
Una volta autorizzato, Claude potrà accedere agli strumenti MCP di Octoparse.
サーバー追加後、MCPメニューを開いて octoparseを選択し、ブラウザでOAuth認証を完了させてください。
認証が完了すると、ClaudeからOctoparseの各ツールにアクセスできるようになります。
서버 추가가 완료되면 MCP 메뉴를 열고 octoparse를 선택한 뒤, 브라우저에서 OAuth 인증을 완료합니다.
인증이 완료되면 Claude에서 Octoparse MCP 도구를 사용할 수 있습니다.
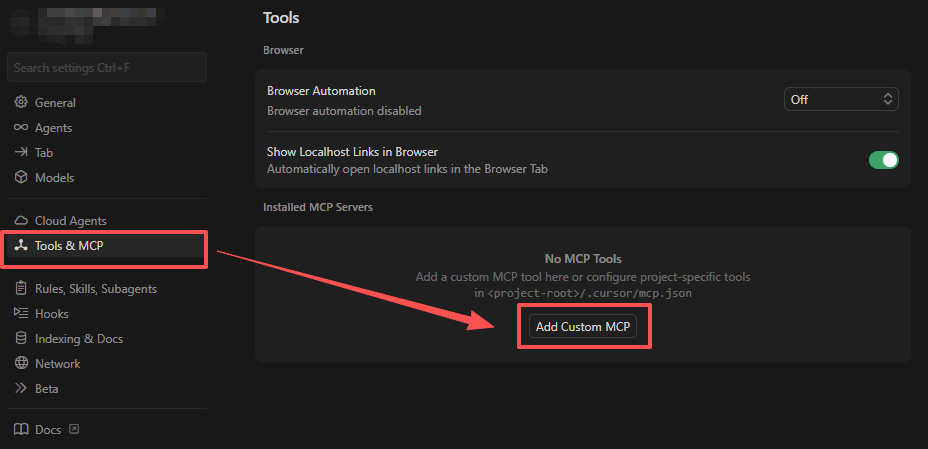
Open Settings → Tools & MCP, then click Add Custom MCP.
Öffnen Sie die Einstellungen → Tools & MCP und klicken Sie dann auf Add Custom MCP.
Open Settings → Tools & MCP, then click Add Custom MCP.
Ouvrez Paramètres → Outils & MCP, puis cliquez sur Ajouter un MCP personnalisé.
Apri Settings → Tools e MCP, quindi fai clic su Add Custom MCP.
Settings → Tools & MCP を開き、Add Custom MCP をクリックします。
설정 → Tools & MCP로 이동한 후 Add Custom MCP를 클릭합니다.
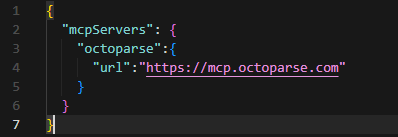
Add the Octoparse MCP server under the mcpServers configuration.
Fügen Sie den Octoparse MCP-Server unter der mcpServers-Konfiguration hinzu.
Add the Octoparse MCP server under the mcpServers configuration.
Ajoutez le serveur MCP Octoparse dans la configuration mcpServers.
Aggiungere il server Octoparse MCP alla configurazione mcpServers.
mcpServers の設定にOctoparse MCPサーバーを追加します。
mcpServers 설정에 Octoparse MCP 서버를 추가합니다.
{
  "mcpServers": {
    "octoparse": {
      "url": "https://mcp.octoparse.com"
    }
  }
}
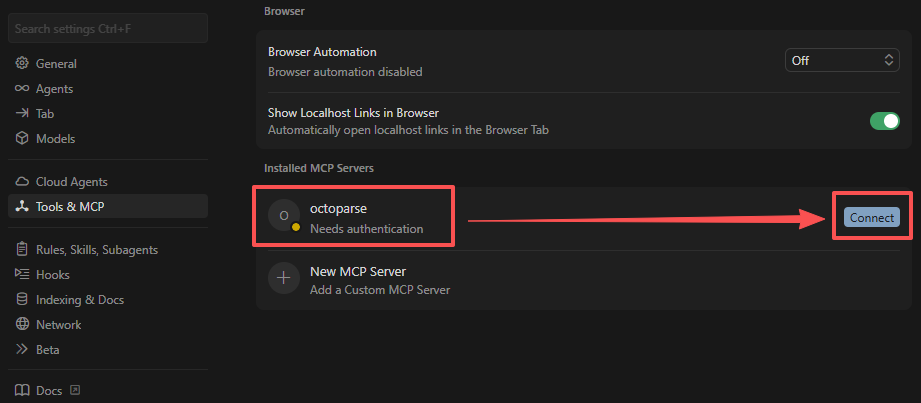
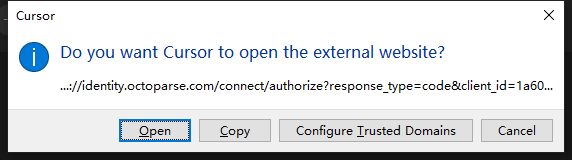
Return to the Tools & MCP, click connect next to octoparse, and complete OAuth authorization in your browser.
Gehen Sie zurück zu Tools & MCP,klicken Sie neben octoparse auf Connect und schließen Sie die OAuth-Authentifizierung in Ihrem Browser ab.
Return to Tools & MCP, click connect next to octoparse, and complete OAuth authorization in your browser.
Retournez dans Outils & MCP, cliquez sur Se connecter à côté de octoparse et effectuez l’autorisation OAuth dans votre navigateur.
Torna alla scheda Tools & MCP, clicca su connect accanto a octoparse e completa l'autorizzazione OAuth nel tuo browser.
Tools & MCPに戻り、 octoparse の横にある connectをクリックして、ブラウザでOAuth認証を完了させます。
설정이 완료되면 Tools & MCP로 돌아가 octoparse 항목 옆의 Connect를 클릭하고, 브라우저에서 OAuth 인증을 완료합니다.
Once authorized, Cursor can access Octoparse MCP tools.
Nach der Authentifizierung kann Cursor auf die Octoparse MCP-Tools zugreifen.
Once authorized, Cursor can access Octoparse MCP tools.
Une fois l’autorisation terminée, Cursor pourra accéder aux outils MCP d’Octoparse.
Una volta autorizzato, Cursor potrà accedere agli strumenti MCP di Octoparse.
認証が完了すると、CursorからOctoparse MCPツールにアクセスできるようになります。
인증이 완료되면 Cursor에서 Octoparse MCP 도구를 사용할 수 있습니다.
Edit the Gemini CLI configuration file at ~/.gemini/settings.json.
Bearbeiten Sie die Gemini CLI-Konfigurationsdatei unter ~/.gemini/settings.json.
Edit the Gemini CLI configuration file at ~/.gemini/settings.json.
Modifiez le fichier de configuration de Gemini CLI situé à ~/.gemini/settings.json.
Modifica il file di configurazione di Gemini CLI a ~/.gemini/settings.json.
~/.gemini/settings.jsonにあるGemini CLIの設定ファイルを編集します。
~/.gemini/settings.json경로에 있는 Gemini CLI 설정 파일을 편집합니다.
{
  "mcpServers": {
    "octoparse": {
      "httpUrl": "https://mcp.octoparse.com",
      "oauth": {
        "clientId": "Octoparse",
        "enabled": true
      }
    }
  }
}
Add the Octoparse MCP server configuration, then restart Gemini CLI if needed.
Fügen Sie die Octoparse MCP-Serverkonfiguration hinzu und starten Sie Gemini CLI bei Bedarf neu.
Add the Octoparse MCP server configuration, then restart Gemini CLI if needed.
Ajoutez la configuration du serveur MCP Octoparse, puis redémarrez Gemini CLI si nécessaire.
Aggiungere la configurazione del server Octoparse MCP, quindi riavviare Gemini CLI se necessario.
Octoparse MCPサーバーの設定を追加し、必要に応じてGemini CLIを再起動してください。
Octoparse MCP 서버 설정을 추가한 후, 필요한 경우 Gemini CLI를 재시작합니다.
Open the MCP menu, select octoparse, and complete OAuth authorization in your browser.
Öffnen Sie das MCP-Menü, wählen Sie octoparse aus und schließen Sie die OAuth-Authentifizierung in Ihrem Browser ab.
Open the MCP menu, select octoparse, and complete OAuth authorization in your browser.
Ouvrez le menu MCP, sélectionnez octoparse et effectuez l’autorisation OAuth dans votre navigateur.
Apri il menu MCP, seleziona Octoparse e completa l'autorizzazione OAuth nel tuo browser.
MCPメニューを開き、octoparseを選択してブラウザでOAuth認証を完了させてください。
이후 MCP 메뉴를 열고 octoparse를 선택한 뒤, 브라우저에서 OAuth 인증을 완료합니다.
인증이 완료되면 Gemini CLI에서 Octoparse MCP 도구를 사용할 수 있습니다.
Once authorized, Gemini CLI can access Octoparse MCP tools.
Nach der Authentifizierung kann Gemini CLI auf die Octoparse MCP-Tools zugreifen.
Once authorized, Gemini CLI can access Octoparse MCP tools.
Une fois l’autorisation terminée, Gemini CLI pourra accéder aux outils MCP d’Octoparse.
Una volta autorizzato, Gemini CLI potrà accedere agli strumenti MCP di Octoparse.
認証されると、Gemini CLIからOctoparse MCPツールにアクセスできるようになります。
Install an MCP-enabled extension such as Cline or Roo Code.
Installieren Sie eine MCP-fähige Erweiterung wie Cline oder Roo Code.
Install an MCP-enabled extension such as Cline or Roo Code.
Installez une extension compatible MCP, telle que Cline ou Roo Code.
Installa un'estensione compatibile con MCP, come Cline o Roo Code.
Cline や Roo CodeなどのMCP対応拡張機能をインストールします。
Cline 또는 Roo Code와 같이 MCP를 지원하는 확장 프로그램을 설치합니다.
Open the extension settings and edit the MCP configuration file.
Öffnen Sie die Erweiterungseinstellungen und bearbeiten Sie die MCP-Konfigurationsdatei.
Open the extension settings and edit the MCP configuration file.
Ouvrez les paramètres de l’extension et modifiez le fichier de configuration MCP.
Apri le impostazioni dell'estensione e modifica il file di configurazione di MCP.
拡張機能の設定を開き、MCP 設定ファイルを編集します。
확장 프로그램 설정으로 이동하여 MCP 설정 파일을 편집합니다.
Add the Octoparse MCP server under the mcpServers configuration.
Fügen Sie den Octoparse MCP-Server unter der mcpServers-Konfiguration hinzu.
Add the Octoparse MCP server under the mcpServers configuration.
Ajoutez le serveur MCP Octoparse dans la configuration mcpServers.
Aggiungere il server Octoparse MCP alla configurazione mcpServers.
mcpServers 설정에 Octoparse MCP 서버를 추가합니다.
{
  "mcpServers": {
    "octoparse": {
      "url": "https://mcp.octoparse.com"
    }
  }
}
Save the file, then complete OAuth authorization when prompted in your browser.
Speichern Sie die Datei und schließen Sie die OAuth-Authentifizierung ab, wenn Sie in Ihrem Browser dazu aufgefordert werden.
Save the file, then complete OAuth authorization when prompted in your browser.
Enregistrez le fichier, puis effectuez l’autorisation OAuth lorsqu’une invite s’affiche dans votre navigateur.
Salva il file, quindi completa l'autorizzazione OAuth quando richiesto nel tuo browser.
ファイルを保存し、ブラウザでプロンプトが表示されたらOAuth認証を完了させてください。
설정 파일을 저장한 후, 브라우저에서 표시되는 안내에 따라 OAuth 인증을 완료합니다.
Once authorized, the Octoparse MCP tools are available in VS Code.
Nach der Authentifizierung sind die Octoparse MCP-Tools in VS Code verfügbar.
Once authorized, the Octoparse MCP tools are available in VS Code.
Une fois l’autorisation terminée, les outils MCP d’Octoparse seront disponibles dans VS Code.
Una volta autorizzati, gli strumenti Octoparse MCP sono disponibili in VS Code.
認証されると、VS CodeでOctoparse MCPツールが利用可能になります。
인증이 완료되면 VS Code에서 Octoparse MCP 도구를 사용할 수 있습니다.
A browser window will open for Octoparse login. Sign in and confirm access. Ein Browserfenster wird für die Octoparse-Anmeldung geöffnet. Melden Sie sich an und bestätigen Sie den Zugriff. Se abrirá una ventana el navegador para iniciar sesión en Octoparse. Inicia sesión y confirma la autorización. Une fenêtre de navigateur s’ouvrira pour vous connecter à Octoparse. Connectez-vous ensuite et confirmez l’autorisation. Si aprirà una finestra del browser per l'accesso a Octoparse. Effettua l'accesso e conferma l'autorizzazione. Octoparseログイン用のブラウザウィンドウが開きます。サインインしてアクセスを承認してください。 브라우저가 자동으로 열리며 Octoparse 로그인 및 접근 권한 승인을 요구합니다.
Features
Funktionen
Funcionalidades
Fonctionnalités
Caratteristiche
機能
주요 기능
Find suitable Octoparse scraping templates using AI.
Finden Sie geeignete Octoparse Scraping-Templates mit KI.
Encuentra plantillas de scraping de Octoparse adecuadas mediante IA.
Trouvez des modèles de scraping Octoparse adaptés à vos besoins grâce à l’IA.
Cerca modelli di scraping Octoparse adatti utilizzando l'AI.
AIを使用して適切なOctoparseスクレイピングテンプレートを見つけます。
AI를 활용하여 목적에 적합한 Octoparse 데이터 수집 템플릿을 검색합니다.
Create new scraping tasks through natural language.
Erstellen Sie neue Scraping-Aufgaben über natürliche Sprache.
Crea nuevas tareas de scraping mediante lenguaje natural.
Créez de nouvelles tâches de scraping en utilisant le langage naturel.
Crea nuove attività di web scraping utilizzando il linguaggio naturale.
自然言語で新しいスクレイピングタスクを作成します。
자연어 입력을 통해 새로운 데이터 수집 작업을 생성합니다.
Start, stop, and view task execution status.
Starten, stoppen und sehen Sie den Status der Aufgabenausführung ein.
Inicia, detén y consulta el estado de ejecución de las tareas.
Démarrez, arrêtez et consultez l’état d’exécution des tâches.
Avvia, interrompi e visualizza lo stato di esecuzione delle attività.
タスクの開始、停止、実行ステータスの表示を行います。
작업을 실행, 중지하고 실행 상태를 확인합니다.
Monitor task progress in real time.
Überwachen Sie den Aufgabenfortschritt in Echtzeit.
Supervisa el progreso de las tareas en tiempo real.
Surveillez la progression des tâches en temps réel.
Monitora l'avanzamento delle attività in tempo reale.
タスクの進捗をリアルタイムで監視します。
작업 진행 상황을 실시간으로 모니터링합니다.
Export scraped data in JSON or CSV format.
Exportieren Sie die gescrapten Daten im JSON- oder CSV-Format.
Exporta los datos extraídos en formato JSON o CSV.
Exportez les données extraites au format JSON ou CSV.
Esporta i dati estratti in formato JSON o CSV.
スクレイピングしたデータをJSONまたはCSV形式でエクスポートします。
수집된 데이터를 JSON 또는 CSV 형식으로 내보냅니다.
View account balance, subscription status, and plan details.
Sehen Sie sich den Kontostand, den Abonnementstatus und die Tarifdetails an.
Consulta el saldo de la cuenta, el estado de la suscripción y los detalles del plan.
Consultez le solde de votre compte, l’état de votre abonnement et les détails de votre forfait.
Visualizza il saldo del conto, lo stato dell'abbonamento e i dettagli del piano.
アカウント残高、サブスクリプションステータス、プランの詳細を表示します。
계정 잔액, 구독 상태 및 요금제 정보를 조회합니다.
Available MCP Tools
Verfügbare MCP-Tools
Herramientas MCP disponibles
Outils MCP disponibles
Strumenti MCP disponibile
利用可能なMCPツール
사용 가능한 MCP 도구
Account Management Kontoverwaltung Gestión de la cuenta Gestion du compte Gestione account アカウント管理 계정 관리
View account details
Kontodetails einsehen
Ver detalles de la cuenta
Voir mes informations de compte
Visualizza informazioni account
アカウント詳細の表示
계정 정보 조회
View your Octoparse account level, balance, and subscription status.
Ihr Octoparse-Kontolevel, Guthaben und Abonnementstatus einsehen.
Consulta el nivel de tu cuenta de Octoparse, el saldo y el estado de la suscripción.
Consultez les informations de votre compte Octoparse : niveau de compte, solde et état de l’abonnement.
Visualizza il livello del tuo account Octoparse, il saldo e lo stato dell'abbonamento.
Octoparseのアカウントレベル、残高、サブスクリプションステータスを表示します。
Octoparse 계정의 등급, 잔액 및 구독 상태를 확인합니다.
- "View my Octoparse account information"
- "How much balance do I have left?"
- "What is my subscription status?"
- "What account level am I on?"
- "Meine Octoparse-Kontoinformationen einsehen"
- "Wie viel Guthaben habe ich noch?"
- "Wie ist mein Abonnementstatus?"
- "Welches Kontolevel habe ich?"
- "Ver la información de mi cuenta de Octoparse"
- "¿Cuánto saldo me queda?"
- "¿Cuál es el estado de mi suscripción?"
- "¿En qué nivel de cuenta estoy?"
- "Afficher les informations de mon compte Octoparse"
- "Quel est le solde restant ?"
- "Quel est l’état de mon abonnement ?"
- "Quel est mon niveau de compte ?"
- "Visualizza le informazioni del mio account Octoparse"
- "Quanto saldo mi è rimasto?"
- "Qual è lo stato del mio abbonamento?"
- "Qual è il mio livello di account?"
- 「Octoparseのアカウント情報を表示して」
- 「残高はあとどれくらいありますか?」
- 「サブスクリプションの状態はどうなっていますか?」
- 「私のアカウントレベルは何ですか?」
- "내 Octoparse 계정 정보를 보여줘"
- "현재 남은 잔액이 얼마야?"
- "내 구독 상태를 확인해줘"
- "내 계정 등급이 뭐야?"
Scraping Templates Scraping Templates Plantillas de scraping Gestion des modèles Modelli di scraping スクレイピングテンプレート 수집 템플릿
Search Templates
Templates durchsuchen
Buscar plantillas
Rechercher des modèles Octoparse
Cerca modelli
テンプレート検索
템플릿 검색
Find suitable Octoparse scraping templates using AI.
Passende Octoparse-Scraping-Templates per KI finden.
Encuentra plantillas de scraping de Octoparse adecuadas mediante IA.
Trouvez des modèles de scraping Octoparse adaptés à vos besoins grâce à l’IA.
Cerca modelli di scraping Octoparse adatti utilizzando l'AI.
AIを使用して適切なOctoparseスクレイピングテンプレートを見つけます。
AI를 활용하여 적합한 Octoparse 데이터 수집 템플릿을 검색합니다.
- "Find a template for scraping Amazon product data"
- "Are there templates for LinkedIn scraping?"
- "Search e-commerce scraping templates"
- "Show popular templates"
- "Finden Sie ein Template für das Scraping von Amazon-Produktdaten"
- "Gibt es Templates für LinkedIn-Scraping?"
- "Durchsuchen Sie E-Commerce-Scraping-Templates"
- "Zeigen Sie beliebte Templates"
- "Buscar una plantilla para extraer datos de productos de Amazon"
- "¿Hay plantillas para scraping de LinkedIn?"
- "Buscar plantillas de scraping para e-commerce"
- "Mostrar plantillas populares"
- "Trouver un modèle pour extraire les données produits d’Amazon"
- "Y a-t-il des modèles pour le scraping LinkedIn ?"
- "Rechercher des modèles de scraping e-commerce"
- "Afficher les modèles populaires"
- "Aiutami a trovare un modello per estrarre dati sui prodotti Amazon"
- "Ci sono modelli adatti per estrarre dati su LinkedIn?"
- "Cerca modelli di scraping relativi all'e-commerce"
- "Mostrami i modelli più usati"
- 「Amazonの商品データをスクレイピングするためのテンプレートを探して」
- 「LinkedInのスクレイピング用テンプレートはありますか?」
- 「ECサイトのスクレイピングテンプレートを検索して」
- 「人気のテンプレートを表示して」
- "아마존 제품 정보를 스크래핑할 수 있는 템플릿을 찾아줘"
- "링크드인을 스크래핑하기에 적합한 템플릿이 있어?"
- "이커머스 관련 스크래핑 템플릿을 검색해줘"
- "인기 있는 템플릿들을 보여줘"
Create Template Task
Template-Aufgabe erstellen
Crear tarea a partir de una plantilla
Créer une tâche à partir d'un modèle
Crea attività usando modello
テンプレートタスクの作成
템플릿 기반 작업 생성
Create a new scraping task using a selected template.
Erstellen Sie eine neue Scraping-Aufgabe mit einem ausgewählten Template.
Crea una nueva tarea de scraping utilizando una plantilla seleccionada.
Créez une nouvelle tâche de scraping en utilisant un modèle sélectionné.
Crea una nuova attività di scraping usando un modello selezionato.
選択したテンプレートを使用して新しいスクレイピングタスクを作成します。
선택한 템플릿을 사용하여 새로운 데이터 수집 작업을 생성합니다.
- "Create a new task using template 12345, name it 'My Amazon Scraper'"
- "Create a task from the Amazon product template"
- "Create a task and save it to the ‘E-commerce Data’ group"
- "Erstellen Sie mit dem Template 12345 eine neue Aufgabe und benennen Sie sie ‚My Amazon Scraper‘"
- "Erstellen Sie eine Aufgabe aus dem Amazon-Produkt-Template."
- "Erstellen Sie eine Aufgabe und speichern Sie sie in der Gruppe ‚E-commerce Data‘"
- "Crear una nueva tarea usando la plantilla 12345 y nombrarla ‘Mi Amazon Scraper’"
- "Crear una tarea a partir de la plantilla de productos de Amazon"
- "Crear una tarea y guardarla en el grupo ‘E-commerce Data"
- "Créer une nouvelle tâche avec le modèle 12345, nommez-la ‘Mon Scraper Amazon’ "
- "Créer une tâche à partir du modèle de produit Amazon"
- "Créer une tâche et l’enregistrer dans le groupe ‘Données E-commerce’ "
- "Crea una nuova attività usando il modello 12345, nominalo 'Mio Scraper Amazon'"
- "Crea un'attività di scraping usando il modello prodotti Amazon"
- "Crea un'attività basata su questo modello, inseriscilo nel gruppo 'Dati E-commerce'"
- 「テンプレート12345を使用して新しいタスクを作成し、名前を 'My Amazon Scraper' にして」
- 「Amazon商品テンプレートからタスクを作成して」
- 「タスクを作成して 'ECデータ' グループに保存して」
- "템플릿 12345를 사용해서 '내 아마존 스크래퍼'라는 이름으로 새 작업을 만들어줘"
- "아마존 상품 템플릿으로 작업 만들어줘"
- "이 템플릿으로 작업을 만들고 '이커머스 데이터' 작업 그룹에 넣어줘"
Task Management Aufgabenverwaltung Gestión de tareas Gestion des tâches Gestione delle attività タスク管理 작업 관리
Search Tasks
Aufgaben durchsuchen
Buscar tareas
Rechercher des tâches
Cerca attività
タスク検索
작업 검색
Find tasks in your task list.
Finden Sie Aufgaben in Ihrer Aufgabenliste.
Encuentra tareas en tu lista de tareas.
Trouvez des tâches dans votre liste de tâches.
Cerca attività specifica nel tuo elenco di attività.
タスクリスト内のタスクを検索します。
작업 목록에서 조건에 맞는 작업을 검색합니다.
- "Find my Amazon-related tasks"
- "Search tasks with 'test' in the name"
- "Show running tasks"
- "List all tasks"
- "Finden Sie meine Amazon-bezogenen Aufgaben"
- "Durchsuchen Sie Aufgaben nach ‚test‘ im Namen"
- "Zeigen Sie laufende Aufgaben"
- "Listen Sie alle Aufgaben auf"
- "Buscar mis tareas relacionadas con Amazon"
- "Buscar tareas con ‘test’ en el nombre"
- "Mostrar tareas en ejecución"
- "Listar todas las tareas"
- "Trouver mes tâches liées à Amazon"
- "Rechercher les tâches contenant ‘test’ dans le nom"
- "Afficher les tâches en cours d’exécution"
- " Lister toutes les tâches"
- "Trova le mie attività relative ad Amazon"
- "Cerca attività con 'test' nel nome"
- "Mostra le attività in esecuzione"
- "Elenca tutte le mie attività"
- 「Amazon関連のタスクを探して」
- 「名前に 'test' が含まれるタスクを検索して」
- 「実行中のタスクを表示して」
- 「すべてのタスクをリストアップして」
- "아마존 관련 작업들을 찾아줘"
- "이름에 'test'가 포함된 작업을 검색해줘"
- "현재 실행 중인 작업들을 보여줘"
- "내 모든 작업을 나열해줘"
Start Task
Aufgabe starten
Iniciar tarea
Démarrer une tâche
Avvia attività
タスク開始
작업 실행
Start a scraping task in the cloud.
Starten Sie eine Scraping-Aufgabe in der Cloud.
Inicia una tarea de scraping en la nube.
Démarrez une tâche de scraping dans le cloud.
Avvia un'attività di scraping in cloud.
クラウドでスクレイピングタスクを開始します。
클라우드 환경에서 데이터 수집 작업을 실행합니다.
- "Start task abc123"
- "Run my Amazon scraper"
- "Execute this task"
- "Starten Sie die Aufgabe abc123"
- "Führen Sie Ihren Amazon-Scraper aus"
- "Führen Sie diese Aufgabe aus"
- "Iniciar la tarea abc123"
- "Ejecutar mi scraper de Amazon"
- "Ejecutar esta tarea"
- "Démarrer la tâche abc123"
- "Exécuter mon scraper Amazon"
- "Lancer cette tâche"
- "Avvia l'attività abc123"
- "Inizia a far eseguire il mio scraper Amazon"
- "Esegui questa attività di scraping"
- 「タスク abc123 を開始して」
- 「私のAmazonスクレイパーを実行して」
- 「このタスクを実行して」
- "작업 abc123을 실행"
- "내 아마존 스크래퍼를 실행해"
- "이 스크래핑 작업을 실행해줘"
Only templates that support cloud execution can be started here. Templates that support local execution must be run in the Octoparse desktop client. Hier können nur Templates gestartet werden, die Cloud-Ausführung unterstützen. Templates mit Unterstützung für lokale Ausführung müssen im Octoparse-Desktop-Client ausgeführt werden. Solo se pueden iniciar aquí las plantillas que admiten ejecución en la nube. Las plantillas que admiten ejecución local deben ejecutarse en el cliente de escritorio de Octoparse. Seuls les modèles prenant en charge l’exécution dans le cloud peuvent être démarrés ici. Les modèles exécutables uniquement localement doivent être lancés depuis le client Octoparse Desktop. Qui è possibile avviare solo i modelli che supportano l'esecuzione in cloud. I modelli che supportano l'esecuzione in locale devono essere eseguiti tramite il client desktop di Octoparse クラウド実行をサポートしているテンプレートのみ、ここで開始できます。ローカル実行をサポートしているテンプレートは、Octoparseデスクトップクライアントで実行する必要があります 클라우드 실행을 지원하는 템플릿만 MCP 서버를 통해 실행할 수 있습니다. 로컬 실행만 지원하는 템플릿은 Octoparse 데스크톱 클라이언트에서 실행해야 합니다.
Exporting Data Datenexport Exportación de datos Exportation de données Esportazione dati データエクスポート 데이터 내보내기
Export Data
Daten exportieren
Exportar datos
Exporter les données extraites
Esporta dati
データエクスポート
데이터 내보내기
Export scraped task data to a local file. Supports JSON and CSV formats.
Gescrapte Aufgaben-Daten in eine lokale Datei exportieren. Unterstützt JSON- und CSV-Formate.
Exporta los datos de las tareas de scraping a un archivo local. Admite los formatos JSON y CSV.
Exportez les données extraites d’une tâche vers un fichier local. Les formats JSON et CSV sont pris en charge.
Esporta i dati estratti di un'attività in un file locale. Supporta i formati JSON e CSV.
スクレイピングしたタスクデータをローカルファイルにエクスポートします。JSONおよびCSV形式をサポートしています。
작업을 통해 수집된 데이터를 로컬 파일로 저장합니다. JSON 및 CSV 형식을 지원합니다.
- "Export data from task abc123 as JSON"
- "Save scraped data to exports/data.csv"
- "Export all data in batches of 500 records"
- "Preview the first 100 records"
- "Daten aus Aufgabe abc123 als JSON exportieren"
- "Gescrapte Daten unter exports/data.csv speichern"
- "Daten in Batches von 500 Datensätzen exportieren"
- "Die ersten 100 Datensätze anzeigen"
- "Exportar los datos de la tarea abc123 en formato JSON"
- "Guardar los datos extraídos en exports/data.csv"
- "Exportar todos los datos en lotes de 500 registros"
- "Previsualizar los primeros 100 registros"
- "Exporter les données de la tâche abc123 au format JSON"
- "Enregistrer les données extraites dans exports/data.csv"
- "Exporter toutes les données par lots de 500 enregistrements"
- "Afficher un aperçu des 100 premiers enregistrements"
- "Esporta i dati dell'attività abc123, salva come file JSON"
- "Salva i dati estratti in exports/data.csv"
- "Esporta tutti i dati, prendi 500 record alla volta"
- "Ottieni un'anteprima dei primi 100 record dell'attività"
- 「タスク abc123 のデータをJSONとしてエクスポートして」
- 「スクレイピングしたデータを exports/data.csv に保存して」
- 「すべてのデータを500レコードずつのバッチでエクスポートして」
- 「最初の100レコードをプレビューして」
- "작업 abc123의 데이터를 JSON으로 내보내기"
- "수집 데이터를 exports/data.csv로 저장"
- "500개 단위로 전체 데이터 내보내기"
- "처음 100개 데이터 미리 보기"
Example Workflow
Beispiel Arbeitsablauf
Flujo de trabajo de ejemplo
Exemple de flux de travail
Flusso di lavoro di esempio
使用例
사용 예시
Complete Workflow
Vollständiger Arbeitsablauf
Flujo de trabajo completo
Flux de travail complet
Completa il flusso di lavoro
操作全体の流れ
전체 워크플로우
You: "View my Octoparse account information"
AI: Returns your account level, balance, and subscription status.
Sie: „Meine Octoparse-Kontoinformationen anzeigen“
KI: Gibt Ihr Kontolevel, Guthaben und Abonnementstatus zurück.
Tú: "Ver la información de mi cuenta de Octoparse"
IA: Devuelve el nivel de tu cuenta, el saldo y el estado de la suscripción.
Vous : "Affiche les informations de mon compte Octoparse"
IA : Affiche votre niveau, solde, abonnement, etc.
Tu: "Visualizza le informazioni del mio account Octoparse"
AI: Mostra livello dell'account, saldo, stato dell'abbonamento, ecc.
あなた:「Octoparseのアカウント情報を表示して」
AI:アカウントレベル、残高、サブスクリプションステータスを返します。
사용자: "내 Octoparse 계정 정보를 보여줘"
AI: 계정 등급, 잔액 및 구독 상태 반환
You: "Find a template for scraping Amazon products"
AI: Returns a list of matching templates, including template ID, name, description
Sie: „Finden Sie ein Template zum Scrapen von Amazon-Produkten“
KI: Gibt eine Liste passender Templates zurück, inklusive Template-ID, Name und Beschreibung.
Tú: “Buscar una plantilla para extraer productos de Amazon”
IA: Devuelve una lista de plantillas coincidentes, incluyendo el ID de la plantilla, el nombre y la descripción.
Vous : "Trouve-moi un modèle pour les produits AmazonIA : Retourne les modèles correspondants (ID, nom, description)"
IA : Retourne les modèles correspondants (ID, nom, description)
Tu: "Aiutami a trovare un modello per scrapare prodotti Amazon"
AI: Restituisce l'elenco dei modelli corrispondenti, inclusi ID, nome e descrizione.
あなた:「Amazonの商品をスクレイピングするためのテンプレートを探して」
AI:テンプレートID、名前、説明を含む一致하는テンプレートのリストを返します。
사용자: "아마존 상품 데이터를 수집할 수 있는 템플릿 찾아줘"
AI: 템플릿 ID, 이름, 설명을 포함한 목록 반환
You: "Create a task using template 12345, name it 'Amazon Phone Scraper'"
AI: Creates the task and returns task ID
Sie: „Erstellen Sie eine Aufgabe mit Template 12345 und benennen Sie sie ‚Amazon Phone Scraper‘“
KI: Erstellt die Aufgabe und gibt die Aufgaben-ID zurück.
Tú: "Crear una tarea usando la plantilla 12345 y nombrarla ‘Amazon Phone Scraper’"
IA: Crea la tarea y devuelve el ID de la tarea.
Vous : "Crée une tâche avec le modèle 12345 nommée 'Scraper Téléphones Amazon'"
IA : Crée la tâche et renvoie l’ID de la tâche.
Tu: "Crea un'attività uszando il modello 12345, nominala 'Amazon Phone Scraper'"
AI: Crea l'attività e restituisce l'ID dell'attività
あなた:「テンプレート12345を使用してタスクを作成し、名前を 'Amazon Phone Scraper' にして」
AI:タスクを作成し、タスクIDを返します
사용자: "템플릿 12345로 'Amazon Phone Scraper' 작업 생성"
AI: 작업 생성 후 작업 ID 반환
You: "Start this task"
AI: Starts the task and reports its status
Sie: „Starten Sie diese Aufgabe“
KI: Startet die Aufgabe und meldet deren Status.
Tú: “Iniciar esta tarea”
IA: Inicia la tarea y muestra su estado.
Vous : "Lance la tâche que je viens de créer"
IA : Démarre la tâche et confirme l'état
Tu: "Avvia questa attività"
AI: Avvia l'attività e ne comunica lo stato
あなた:「このタスクを開始して」
AI:タスクを開始し、そのステータスを報告します。
사용자: "이 작업 실행해줘"
AI: 작업 실행 및 현재 상태 반환
You: "Has the task finished?"
AI: Checks and returns current task status (Running/Completed/Failed, etc.)
Sie: „Ist die Aufgabe beendet?“
KI: Prüft und gibt den aktuellen Aufgabenstatus zurück (Laufend/Abgeschlossen/Fehlgeschlagen usw.).
Tú: "¿La tarea ya ha finalizado?"
IA: Comprueba y devuelve el estado actual de la tarea (En ejecución / Completada / Fallida, etc.).
Vous : "La tâche est-elle terminée ?"
IA : Vérifie et affiche l'état actuel (En cours/Terminé/Échec, etc.)
Tu: "L'attività è terminata?"
AI: Verifica e restituisce lo stato attuale dell'attività (In esecuzione/Completata/Non riuscita, ecc.)
あなた:「タスクは完了しましたか?」
AI:現在のタスクステータス(実行中/完了/失敗など)を確認して返します。
사용자: "작업이 완료됐어?"
AI: 현재 작업 상태 반환 (실행 중 / 완료 / 실패 등)
You: "Export all data as JSON"
AI: Exports data to the specified location
Sie: „Exportieren Sie alle Daten als JSON“
KI: Exportiert die Daten an den angegebenen Ort.
Tú: "Exportar todos los datos en JSON"
IA: Exporta los datos a la ubicación especificada.
Vous : "Exporte toutes les données en JSON"
IA : Exporte les données vers l’emplacement spécifié
Tu: "Esporta tutti i dati in formato JSON"
AI: Esporta i dati nella posizione specificata
あなた:「すべてのデータをJSONとしてエクスポートして」
AI:指定された場所にデータをエクスポートします。
사용자: "모든 데이터를 JSON으로 내보내기"
AI: 지정된 위치로 데이터 저장
Troubleshooting
Fehlerbehebung
Solución de problemas
Dépannage
Risoluzione dei problemi
トラブルシューティング
문제 해결
❓ Why can't my task start?
❓ Warum kann meine Aufgabe nicht starten?
❓ ¿Por qué no se puede iniciar mi tarea?
❓ Pourquoi ma tâche ne peut-elle pas démarrer ?
❓ Perché la mia attività non si avvia?
❓ なぜタスクが開始されないのですか?
❓ 작업이 실행되지 않는 이유는 무엇인가요?
This usually happens for one of the following reasons:
Dies geschieht normalerweise aus einem der folgenden Gründe:
Esto suele ocurrir por una de las siguientes razones:
Cela peut généralement être dû à l’une des raisons suivantes :
Possibili motivi:
通常、以下のいずれかが原因です:
다음과 같은 원인으로 작업 실행이 실패할 수 있습니다.
- The template does not support cloud execution
Some templates can only run locally and must be executed using the Octoparse desktop client. - Insufficient account balance
Cloud execution consumes credits. Check your remaining balance before starting the task. - The task is already running
A task cannot be started again while it is still in progress. - Account plan limitations
Certain templates and features require a Professional plan or higher.
- Das Template unterstützt keine Cloud-Ausführung
Einige Templates können nur lokal ausgeführt werden und müssen über den Octoparse-Desktop-Client gestartet werden. - Unzureichendes Kontoguthaben
Cloud-Ausführung verbraucht Credits. Überprüfen Sie Ihr verbleibendes Guthaben, bevor Sie die Aufgabe starten. - Die Aufgabe läuft bereits
Eine Aufgabe kann nicht erneut gestartet werden, solange sie noch in Bearbeitung ist. - Einschränkungen des Account-Plans
Bestimmte Templates und Funktionen erfordern einen Professional-Plan oder höher.
- La plantilla no admite ejecución en la nube
SAlgunas plantillas solo pueden ejecutarse de forma local y deben ejecutarse mediante el cliente de escritorio de Octoparse. - Saldo de la cuenta insuficiente
La ejecución en la nube consume créditos. Comprueba tu saldo disponible antes de iniciar la tarea. - La tarea ya está en ejecución
Una tarea no puede iniciarse de nuevo mientras sigue en curso. - Limitaciones del plan de la cuenta
Algunas plantillas y funciones requieren un plan Professional o superior.
- Le modèle ne prend pas en charge l’exécution dans le cloud
Certains modèles ne peuvent être exécutés que localement et doivent être lancés via le client Octoparse Desktop. - Solde de compte insuffisant
L’exécution dans le cloud consomme des crédits. Vérifiez votre solde restant avant de démarrer la tâche. - La tâche est déjà en cours d’exécution
Une tâche ne peut pas être relancée tant qu’elle est toujours en cours. - Limitations liées au plan de compte
Certains modèles et fonctionnalités nécessitent un plan Professionnel ou supérieur.
- テンプレートがクラウド実行をサポートしていない。
一部のテンプレートはローカル実行のみに対応しており、Octoparseデスクトップクライアントを使用して実行する必要があります。 - アカウント残高不足
クラウド実行にはクレジットを消費します。タスクを開始する前に残高を確認してください。 - タスクがすでに実行中
実行中のタスクを重ねて開始することはできません。 - アカウントプランの制限
特定のテンプレートや機能は、プロフェッショナルプラン以上が必要です。
- テンプレートがクラウド実行をサポートしていない。
一部のテンプレートはローカル実行のみに対応しており、Octoparseデスクトップクライアントを使用して実行する必要があります。 - アカウント残高不足
クラウド実行にはクレジットを消費します。タスクを開始する前に残高を確認してください。 - タスクがすでに実行中
実行中のタスクを重ねて開始することはできません。 - アカウントプランの制限
特定のテンプレートや機能は、プロフェッショナルプラン以上が必要です。
- 클라우드 실행 미지원 템플릿: 일부 템플릿은 로컬 환경에서만 실행할 수 있습니다.
- 계정 잔액 부족: 클라우드 실행 시 크레딧이 차감됩니다. 실행 전 잔액을 확인해주세요.
- 이미 실행 중인 작업: 실행 중인 작업은 중복 실행할 수 없습니다.
- 요금제 제한: 일부 템플릿 및 기능은 프로패셔널 요금제 이상에서만 사용할 수 있습니다.
❓ Can't find exported file?
❓ Kann die exportierte Datei nicht finden?
❓ ¿No encuentras el archivo exportado?
❓ Impossible de trouver le fichier exporté ?
❓ Non riesco a trovare il file esportato?
❓ エクスポートされたファイルが見つかりませんか?
❓ 내보낸 파일을 찾을 수 없어요.
Exported files are saved to the file path you specify in the export command.
Exportierte Dateien werden an dem von Ihnen angegebenen Dateipfad gespeichert.
Los archivos exportados se guardan en la ruta de archivo que especifiques en el comando de exportación.
Les fichiers exportés sont enregistrés à l’emplacement spécifié dans la commande d’exportation.
I file esportati vengono salvati nel percorso specificato nel comando di esportazione.
ファイルはエクスポートコマンドで指定したパスに保存されます。
내보낸 파일은 내보내기 명령에서 지정한 경로에 저장됩니다.
- If you use a relative path (for example,
./exports/data.), the file is saved relative to the current working directory. - Using an absolute path is recommended to avoid confusion.
- Wenn Sie einen relativen Pfad verwenden (zum Beispiel,
./exports/data.), wird die Datei relativ zum aktuellen Arbeitsverzeichnis gespeichert. - Die Verwendung eines absoluten Pfads wird empfohlen, um Verwirrung zu vermeiden.
- Si utilizas una ruta relativa (por ejemplo,
./exports/data.), el archivo se guarda de forma relativa al directorio de trabajo actual. - Se recomienda utilizar una ruta absoluta para evitar confusiones.
- Si vous utilisez un chemin relatif ((par exemple,
./exports/data.), le fichier sera enregistré par rapport au répertoire de travail actuel. - Il est recommandé d’utiliser un chemin absolu pour éviter toute confusion.
- Se si utilizza un percorso relativo (ad esempio,
./exports/data.), il file viene salvato rispetto alla directory di lavoro corrente. - Si consiglia di utilizzare un percorso assoluto per evitare confusioni.
- 相対パス (例:
./exports/data.)を使用すると現在の作業ディレクトリに保存されるため、混乱を避けるには絶対パスの使用をお勧めします。 - 混乱を避けるには 絶対パスの使用をお勧めします。
- 상대 경로(예:
./exports/data.)는 현재 작업 디렉터리를 기준으로 저장됩니다. - 혼동을 방지하기 위해 절대 경로 사용을 권장합니다.
❓ Authentication failed
❓ Authentifizierung fehlgeschlagen
❓ Error de autenticación
❓ Échec de l’authentification
❓ Autenticazione fallita, cosa devo fare?
❓ 認証に失敗しました
❓ 인증에 실패했습니다.
If authorization fails, check the following:
Wenn die Autorisierung fehlschlägt, überprüfen Sie Folgendes:
Si la autorización falla, comprueba lo siguiente:
Si l’autorisation échoue, vérifiez les points suivants :
Controlla quanto segue:
認証に失敗した場合は、以下を確認してください
다음 항목을 확인해주세요.
- The Octoparse MCP server address is configured correctly in your MCP client
- Your MCP client supports the OAuth authentication flow
- You completed the authorization step in your browser
- Die Octoparse MCP-Serveradresse ist korrekt in Ihrem MCP-Client konfiguriert
- Ihr MCP-Client unterstützt den OAuth-Authentifizierungsfluss
- Sie haben den Autorisierungsschritt in Ihrem Browser abgeschlossen
- La dirección del servidor MCP de Octoparse está configurada correctamente en tu cliente MCP.
- Tu cliente MCP admite el flujo de autenticación OAuth.
- Has completado el paso de autorización en tu navegador.
- L’adresse du serveur MCP Octoparse est correctement configurée dans votre client MCP.
- Votre client MCP prend en charge le flux d’authentification OAuth.
- Vous avez bien effectué l’étape d’autorisation dans votre navigateur.
- MCPクライアントでOctoparse MCPサーバーのアドレスが正しく設定されているか
- お使いのMCPクライアントがOAuth認証フローに対応しているか
- ブラウザでの認証手順を完了させたか
- MCPクライアントでOctoparse MCPサーバーのアドレスが正しく設定されているか
- お使いのMCPクライアントがOAuth認証フローに対応しているか
- ブラウザでの認証手順を完了させたか
- MCP 클라이언트에 설정된 Octoparse MCP 서버 주소가 올바른지 여부
- 사용 중인 MCP 클라이언트가 OAuth 인증 절차를 지원하는지 여부
- 브라우저에서 인증 절차를 정상적으로 완료했는지 여부
If the issue persists, try reconnecting and re-authorizing the MCP server.
Wenn das Problem weiterhin besteht, versuchen Sie, den MCP-Server erneut zu verbinden und zu autorisieren.
Si el problema persiste, intenta volver a conectarte y reautorizar el servidor MCP.
Si le problème persiste, essayez de reconnecter et de réautoriser le serveur MCP.
Se il problema persiste, provare a disconnettersi e a riautorizzare il server MCP.
問題が解決しない場合は、再接続してMCPサーバーを再認証してみてください。
문제가 지속될 경우 MCP 서버를 다시 연결한 후 인증을 재시도하세요.
Support & Resources
Support & Ressourcen
Soporte y recursos
Support et ressources
Supporto e risorse
サポートとリソース
지원 및 리소스
📚 Documentation
📚 Dokumentation
📚 Documentación
📚 Documentation
📚 Documento
📚 ドキュメント
📚 문서
-
Octoparse API Documentation
Octoparse API Dokumentation
Documentación de la API de Octoparse
Documentation API Octoparse
Documento API Octoparse
Octoparse API ドキュメント
Octoparse API 문서
Technical reference for Octoparse APIs and integrations. Technische Referenz für Octoparse-APIs und Integrationen Referencia técnica para las API e integraciones de Octoparse. Référence technique pour les API et intégrations Octoparse. Documentazione tecnica di riferimento per le API e le integrazioni di Octoparse. Octoparse APIと統合に関する技術リファレンス。 Octoparse API 및 연동을 위한 기술 참고 문서 -
Model Context Protocol (MCP)
Model Context Protocol (MCP)
Model Context Protocol (MCP)
Model Context Protocol (MCP)
Model Context Protocol (MCP)
Model Context Protocol (MCP)
모델 컨텍스트 프로토콜(MCP)
Official specification for the Model Context Protocol. Offizielle Spezifikation für das Model Context Protocol. Especificación oficial del Model Context Protocol Spécification officielle du Model Context Protocol. Specifiche ufficiali per il protocollo di contesto del modello. MCPの公式仕様。 MCP 공식 규격 문서
💬 Support
💬 Unterstützung
💬 Soporte
💬 Support
💬 Supporto
💬 サポート
💬 고객 지원
- Help CenterHilfezentrumCentro de ayudaCentre d’aideCentro di assistenzaヘルプセンター도움말 센터
Browse FAQs, tutorials, and troubleshooting guides in the Octoparse Help Center.
Durchsuchen Sie FAQs, Tutorials und Problemlösungsleitfäden im Octoparse Hilfezentrum.
Consulta las preguntas frecuentes, tutoriales y guías de resolución de problemas en el Centro de ayuda de Octoparse.
Consultez les FAQ, tutoriels et guides de dépannage dans le centre d’aide Octoparse.
Consulta le domande frequenti, i tutorial e le guide alla risoluzione dei problemi nel Centro assistenza di Octoparse.
FAQやチュートリアルについてはOctoparseヘルプセンターを参照してください。 자주 묻는 질문, 사용 가이드 및 문제 해결 문서 제공 - GitHub issues & communityGitHub issues & CommunityIncidencias y comunidad en GitHubProblèmes GitHub & communautéProblemi e community di GitHubGitHubイシュー & コミュニティGitHub 이슈 및 커뮤니티
Report issues, ask questions, and join discussions through the Octoparse GitHub repository and community forum.
Melden Sie Probleme, stellen Sie Fragen und nehmen Sie an Diskussionen im Octoparse GitHub-Repository und Community-Forum.
Informa de incidencias, haz preguntas y participa en las conversaciones a través del repositorio de GitHub de Octoparse y del foro de la comunidad.
Signalez des problèmes, posez des questions et participez aux discussions via le dépôt GitHub et le forum communautaire Octoparse.
Segnala problemi, poni domande e partecipa alle discussioni tramite il repository e il forum della community di Octoparse su GitHub.
問題の報告や質問は GitHubリポジトリとフォーラムで受け付けています。 이슈 등록, 질의응답 및 커뮤니티 토론 참여 - Official supportOffizieller SupportSoporte oficialSupport officielSupporto ufficiale公式サポート공식 고객 지원
Contact Octoparse support via the in-app chat widget (available in the bottom-right corner of the Octoparse website and desktop app), or email
Kontaktieren Sie den Octoparse-Support über das In-App-Chat-Widget (verfügbar in der unteren rechten Ecke der Octoparse-Website und der Desktop-App) oder per E-Mail an
Ponte en contacto con el equipo de soporte de Octoparse a través del widget de chat integrado en la aplicación (disponible en la esquina inferior derecha del sitio web de Octoparse y de la aplicación de escritorio) o por correo electrónico en
Contactez le support Octoparse via le widget de chat intégré à l’application (disponible en bas à droite sur le site web et l’application desktop Octoparse) ou par email à
Contatta l'assistenza di Octoparse tramite il widget di chat integrato nell'app (disponibile nell'angolo in basso a destra del sito web e dell'applicazione desktop di Octoparse) o via e-mail.
Octoparseウェブサイトおよびデスクトップアプリの右下にあるアプリ内チャットウィジェット、またはメール Octoparse 웹사이트 및 데스크톱 앱 우측 하단의 채팅창 또는 이메일 support@octoparse.com을 통해 문의..から公式サポートにお問い合わせください。
Changelog
Änderungsprotokoll
Registro de cambios
Historique des versions
Registro delle modifiche
更新履歴
버전 기록
v0.1.0 (2026-01-22)
- Initial release of the Octoparse MCP server
- ✅ Account management tools
- ✅ Template search and task creation
- ✅ Task management (start, stop, status)
- ✅ Data export (JSON/CSV)
- ✅ OAuth authentication support
- Erstveröffentlichung des Octoparse MCP-Servers
- ✅ Kontoverwaltungstools
- ✅ Template-Suche und Aufgabenerstellung
- ✅ Aufgabenverwaltung (Start, Stopp, Status)
- ✅ Datenexport (JSON/CSV)
- ✅ Unterstützung für OAuth-Authentifizierung
- Versión inicial del servidor MCP de Octoparse
- ✅ Herramientas de gestión de la cuenta
- ✅ Búsqueda de plantillas y creación de tareas
- ✅ Gestión de tareas (inicio, detención y estado)
- ✅ Exportación de datos (JSON/CSV)
- ✅ Compatibilidad con autenticación OAuth
- Première version du serveur MCP Octoparse
- ✅ Outils de gestion de compte
- ✅ Recherche de modèles et création de tâches
- ✅ Gestion des tâches (démarrage, arrêt, état)
- ✅ Exportation des données (JSON / CSV)
- ✅ Prise en charge de l’authentification OAuth
- Prima versione del server Octoparse MCP
- ✅ Strumenti di gestione account
- ✅ Ricerca modelli e creazione attività
- ✅ Gestione attività (avvio, arresto, stato)
- ✅ Esportazione dati (JSON/CSV)
- ✅ Supporto per l'autenticazione OAuth
- Octoparse MCP サーバーの初期リリース
- ✅ アカウント管理ツール
- ✅ テンプレート検索およびタスク作成
- ✅ タスク管理(開始、停止、ステータス)
- ✅ データエクスポート(JSON/CSV)
- ✅ OAuth 認証のサポート
- Octoparse MCP 서버 최초 공개
- ✅ 계정 관리 기능 제공
- ✅ 템플릿 검색 및 작업 생성 기능
- ✅ 작업 관리 기능 (실행, 중지, 상태 조회)
- ✅ 데이터 내보내기 기능 (JSON / CSV)
- ✅ OAuth 인증 지원